Tuesday, 27 October 2015

HOMEMADE GHEE

                                 PURE HOMEMADE GHEE FROM SCRATCH

Well, this is one thing that never drains in my kitchen.Ghee which we keep preparing at home from scratch as and when it gets over.Ghee is good for kids and ofcourse tastes yum with certain dishes.As i have two kids at home , i never forget to prepare ghee and store it.A perfectly prepared ghee can be stored in airtight containers for months together..Stays good for 3 months at room temperature or for 6 months in refrigerator.Ghee can be used in many sweets and for the traditional dhal rice which we serve for babies.And the flavour from homemade ghee is too intense and nothing can beat it.Once u master it , u will never buy the store bought ones.So, here goes my recipe.


                                                         INGREDIENTS

  • Unsalted Butter at room temperature          -                             500gms
  • rock salt                                                       -                             1/2 teaspoon
  • curry leaves/drumstick  leaves(optional)    -                              few
  • curd    (optional)                                         -                              1 tablespoon

         
                                                      METHOD

  • Take the softened 500 gms butter in a  heavy bottomed sauce pan.Make sure it should fit the pan when melted.

  • Heat the pan at very low flame .the entire process should be done only at the minimal flame.
  • Once the butter melts.It becomes frothy with crackling sound.
  • listen to this sound carefully(i mean it..it is the key for producing perfect ghee at home).
  • Meanwhile soak the curry or drumstick leaves in a tablespoon of curd.(i havent used it here as i made the ghee past midnight and so couldnt source them.But trust me, it gives the secret flavour for an aromatic homemade ghee.)
  • the crackling sound of the melted butter should stop before proceeding to the next step.THis may take about 8-10mins.
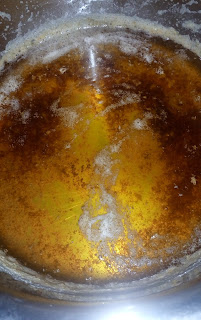
  • Once the crackling sound stops, u will be able to see the clarified butter as the froth get to disperse eventually.see the pic below.be carefull at this stage,the sound should stop completely ,else u will end up with a ghee will be spoilt easily within a week.


  • once the froth fades and the sound stops, the ghee starts frothing up again(be careful here as it may overflow) and start to rise .immediately switch off the flame and add the rock salt and the soaked leaves along with the curd.(it starts crackling again)


Let it cool to room temperature.As it cools again the froth will fade and u will be able to see a beautiful golden syrup beneath.The leaves will become crispy.These leaves tastes yum as such when eaten direct from the ghee..while storing remove the leaves and store just the ghee in an airtight container. this is the sumptuous homemade GHEE. VIOLA!U have made the ghee at home from scratch.

COOK'S NOTE:
  • Always opt for drumstick leaves.They give much better flavour than the curry leaves.Use curry leaves only when u dont have drumstick leaves.
  • the ghee can be stored in an airtight container.the residue which it leaves behind in the vessel can be mixed with rice along with the crispy drumstick leaves and can be given to children.
  • Omit rocksalt if using salted butter.
  • Never get tempted to increase the flame.THe entire process should be done only at minimal flame.


Friday, 23 October 2015

BABYCORN N PEAS IN CAPSICUM CURRY

                                        BABYCORN N PEAS IN CAPSICUM CURRY
I love CAPSICUM..(how many of u does?)..capsicum whatsoever holds a special place in ma kitchen..they go well with any dishes..be it a WESTERN FOOD OR INDIAN..they can be eaten in salads,sanwiches,currys,gravys and so on.Well, this time i wanted the capsicum to lose its crunch and go behind the scenes..yes i wanted it to go hidden in the gravy..So i developed this recipe with a slight north and south indian flavours.Try it, u will love it..


INGREDIENTS:
  • Dried or fresh peas                     -          1cup
                                                                       if using dried peas,soak them overnight.but fresh peas                                                                           always tastes better..
  • Babycorns                                -          6 nos (peeled and cut into circles)
  • capsicum                                  -          1 large
  • onion                                        -          1 large
  • tomato                                      -          1 large
  • cardamom                                -           1
  • cinnamon                                 -           an inch piece
  • fennel seeds                             -           1 teaspoon
  • cloves                                      -           2 nos
  • oil                                            -           2 tablespoons
  • jeera                                        -            1 tablespoon
  • red chilli powder                    -             1 teaspoon
  • turmeric powder                    -              half teaspoon
  • garam masala powder           -              half teaspoon
  • coriander powder                   -             2 teaspoons
  • Salt                                         -             to taste
kasuri methi/dried fenugreek            -            1 tablespoon crushed
 leaves 

water                                                 -            1 n a half cups

METHOD
  • Soak the dried peas overnight.If using fresh peas ,soaking not required.
  • boil the peas and babycorns in a pressure cooker with 1 n a half cups of water.Cokok till one whistle.Turn off flame .Drain and keep aside.Do not discard the water.i have used dried peas here as i made this dish out of season..else i would opt only for fresh peas.

  • IN a pan ,heat oil and temper fennel seeds,cloves,cinnamon,cardamom.
  • Add the onions and tomatoes and fry till the raw smell leaves.

  • Turn off and let it cool.
  • In the mean time, show the capsicum over direct flame as shown in the pic below.

  • Keep rotating the capsicum till it produces black spots like the below pics..am using hands here.But i warn u to use thongs to hold the capsicum over direct flame..obviously it is dangerous to hold with bare hands :P


  • let it cool.start to peel the skin of the capsicum as shown below..it should be still warm for the skin to peel off easily.


  • When the onion tomato mix has cooled, blend them in a mixer to a fine paste


  • Now heat a tablespoon of oil in the same pan.Splutter jeera and add the ground paste to it.
  • saute it for a minute.
  • now add all the spice powders.Mis well.Saute for another minute.
  • Add the boiled peas and babycorns.
  • Add the reserved water from boiling peas and babycorns.
  • add the required salt.let it become thick .


  • Crush the kasuri methi leaves with your fingers roughly.Add it to the thickened gravy and mix well..switch of the flame .
  • this gravy can be served with rotis,chapathis,pooris


EASY PEASY BABYCORN FRITTERS

                                          EASY PEASY BABYCORN FRITTERS


When i have babycorns at home ,i never hesitate to make this dish. This is a kids friendly snack which can be served to them as a evening snack.And the happiest thing is , it does'nt contain any ginger garlic paste..(yes u heard it right..NO ginger garlic paste)..Basically am a lazy person who hates to make ginger garlic paste..so i tried to make a dish which will be easy at hands and can be served in a blink to the kids when they are hungry.And also am not boiling the babycorns here.U gotta cook them in low flame ,In that way it will nicely gets cooked and achieves the proper crunch.When u cook it on medium or high, the outer portion becomes dark brown prematurely, whereas the inside seems to be raw.U are goin to feed your kids, so take your time and let the babycorns cook perfectly.

INGREDIENTS:
  • babycorns                       -                 8-10nos , peeled and cut into fingers.(make 8 pieces out of                                                          a single babycorn)
  • Maida                             -                2 tablespoons
  • rice flour                         -                2 tablespoons
  • pepper and salt               -                 to taste
  • soya sauce                      -                 1/4th teaspoon
  • vinegar                           -                  1/2 teaspoon
  • egg                                 -                  1
  • oil to deep fry
METHOD:
  • Mix together the maida,rice flour,pepper salt.
  • Add soya sauce and vinegar to the egg and beat well
  • Add a well beaten egg to the above mixture and make a paste.
  • Now add the cut baycorns to the above mixture and mix well.
  • Let it marinate for half an hour.
  • Heat oil in a pan.keep the flame on low.
  • The oil is ready when u pour a drop of the batter ,it should immediately float to the top.If it is not floating then the oil is not hot enough.
  • Now when the oil is hot enough, add the marinated babycorn fingers one by one . They tend to stick to eachother.Try to separate them with the ladle.If not u can always do it later.
  • Let it cook till golden brown.

  • remove them and drain in paper towels.
  • Serve hot with tomato ketchup.


Thursday, 22 October 2015

Apple kesari

                          APPLE RAVA KESARI / APPLE SOOJI KESARI


As a child i always hated kesari, i don know the reason why..but once somewhere(i dont remember where,maybe in a temple prasadham) i had  a bit of kesari.It tasted divine and with lotta ghee in it.actually the kesari was floating in ghee.So from then on i started liking it.So i started making kesari often specifically for some festivals or pooja at home.

And i was bored with the usual kesari made with jus the rava/sooji and sugar.So i thought of giving it a healthy twist this time.So thought i did add some apples to it .SO think the kesari infused with the best fruit which is healthy and also tastes divine.And finally what i achieved was a smooth melt in mouth kesari infused with fresh apple flavour.I always use homemade ghee which is anytime better than the store bought ones..So here goes my recipe.

INGREDIENTS:

  • apples                          -                     2nos
  • rava/sooji                    -                     1 cup
  • ghee                            -                     5-6 tablespoons and more if needed
  • water                           -                     2+ half cups
  • sugar                           -                      3/4th cup
  • cardamom powder      -                     1/2 teaspoon
  • raisins and cashews    -                     10nos each
  • salt                              -                     1/4th teaspoon
METHOD:


  1. peel the apples, core it.
  2. chop one of the apples to bigger cubes and the other one very finely chopped as shown in the pic below.


3.heat a tablespoon of ghee in a pan.i always use fresh home made ghee for all my dishes.u can check out the recipe for my homemade ghee here.


4.add cashews and fry for few secs.


5.When they start to brown, add the raisins.And saute till the raisins turn fluffy and cashews turn golden brown.


 6.Now keep the fried cahews and raisins aside.In the same pan add one tablespoon ghee and fry the rava till it gives out the aroma.Should not brown the rava.


7.Meanwhile place the cubed apples with the half cup of water and boil till soft


8.when poked,the apples should feel soft.


9.Let it cool.Drain and grind it into a fine paste in a mixie. Do not discard the water.Use it to grind them to a fine paste.This is called the APPLESAUCE


10.Add the applesauce to the sauce pan.


11.add the 2 cups water(remember the half cup of water we already used to make the applesauce)


12.add the salt.Add the finely chopped apples.Let it boil.


13.Add the fried rava a little at a time ,making sure to mix well each time.Else they form lumps.


14.Cover lid and cook over medium flame for 5 mins.


15.Remove the lid and once you make sure the rava has cooked well, add the sugar.Adding the sugar before will not let the rava to get cooked well.mix till the sugar gets dissolved


16.Add the cardamom powder.Mix well.


17.Add the remaining ghee.Mix well.Make sure that u add enough ghee ..In that case the rava loosens unbelievably to get soaked in the melting ghee..hmmmmm how does that sound??


18.Add the fried cashews and raisins.Mix well.


19.transfer to the serving dish and serve hot.
20.During winters, the ghee may tend to harden when cooled and the kesari becomes lumpy..In that case microwave the kesari on high power for 30 to 45 secs.Then it will loosen up.You can also heat it up in a pan over flame ,but make sure u only simmer it.


COOK'S NOTE:

Do not hesitate to add plenty of ghee for this recipe..Only the ghee gives it the divine melt in the mouth flavour.


Wednesday, 21 October 2015

How to make super soft phulkas

                                                                   PHULKAS


I always wanted to make phulkas which are sooper soft.But trust me each time somehow i fail in something and the result is ..hmmm yes either a hard phulka or a phulka that turns out like a papad or it gets burnt somehow..there are umpteen number of times that i have tried,tested and failed and again the next time tried,tested and failed..this keept on continuing.I always search for a good recipe but again in vain.So many times have tried different methods like addition and subraction of various ingredients into the dough but again failure was my result..but i kept trying untill i figured out a foolproof recipe..
And i wanted to share it with you all.

INGREDIENTS:
  • Whole wheat flour                    -                     2 cups
  • warm milk                              -                     3/4 th cup 
  • salt                                          -                     1 teaspoon
  • vegetable fat/vegetable oil     -                     2 tbs
METHOD:
  • mix flour and salt thoroughly in a mixing bowl.
  • make a well in the centre.start adding warm milk little by little untill you form a pliable dough.
  • the dough should be non sticky.if it is sticky add more flour .


  • the dough should not be too tough also.if it s too tough add little more milk.
  • when the dough becomes non sticky,add the vegetable fat/oil and knead well
  • cover with a lid and let the dough rest for half an hour to 45 mins.
  • after resting ,the dough should feel soft when touched.
  • knead the dough again for another 5mins.
  • note- the more you knead the more soft it becomees.
  • now make small lemon sized balls out of the dough.

  • sprinkle very little flour on your rolling surface and strart rolling the dough to form a circle.
  • do not get tempted to add more flour.the point here is the dough shouldnt stick to the rolling pin.if it sticks then you have to add more flour and knead for few more minutes again.
{am still mastering making perfect circles.pardon me :)}

  • in the meantime heat the roti tawa.it should be hot enough.otherwise the rotis takes more time to cook and becomes hard or papad like.
this is the traditional roti tawa.made of iron.you can use non-stick pan or tawa too.

  • now place the rolled phulka on the pan or tawa and let it cook for 30secs.when you start seeing small bubbles on the surface of the roti ,flip it over.let it cook for another 30secs.

  • now light the nearby burner of your stove and immediately place the roti over the direct flame.use a pair of thongs for transfering and flipping the phulkas on direct flame.

  • it will start to become fluffy.do not leave it for long as it will burn .
  • when u start seeing it become fluffy ,immediately flip it over.
  • then within 5secs transfer to your serving plate.
  • apply melted ghee on top of the phulka for additional flavour.
  • U can view my homemade ghee recipe here homemade ghee

  • serve hot with any gravy


     open flame tawas like the above are available in the market..you can even use these if you dont want to use directly on the burner.But personally i dont like to use these open flame tawas as they give the checked imprints on the finished phulkas.but that doesnt affect the quality of the phulkas.The choice is yours.
     ENJOY SOFT PHULKAS.

    Kindly leave in your comments or even pics in the comments section if you have tried my recipes.thank you