Friday, 17 June 2016

Cheesy Caramelized Yam Flower Cups.


Well..i have been loving yam right from my childhood where my mom makes crispy yam that has been boiled and shallow fried with very basic spices..i would eagerly wait near my mom and love to eat the fried yam as soon as it was removed from the tawa/pan..i have tasted some other dishes using yam but never have tried anything modern with it..So there was lots of yam lying idle in my fridge and as usual i wanted to try something different and that could be enjoyed by my kids as a evening snack..i love caramel so thought why not try caramelizing the yam..(weird right.. i know i know..i love weird stuffs and mostly i succeed with weird dishes..LOL)..

So i tried to combine flavours that could merge with caramelized yam and derived this new recipe and to my surprise each and everything that went into this dish blended so well.i have used readymade spring roll sheets here but you can use homemade sheets too..i will be adding a separate blogpost on how to make the spring roll sheets at home and will update here...

this recipe is served best when hot and before the cups loses their crispiness..

this recipe is super easy to make with very minimal ingredients...and can be served when you need something to be aesthetic at your party tables..i got my child to do the layers..and she was so happy to be helping me in this..so it is that easy ...I love anything that is caramelized and i wanted something to be different than the regular veggies used..i came up with this recipe and used caramelized yam clubbed with cheese..the final Flower cups filled with the caramelized yam tasted divine with the outer super crispy layer..please do try this recipe and lemme know your feedback

          Ingredients:
1. Homemade/readymade spring roll wraps  -  12-15 strips
2.       Yam   -   250gms
3.       Cheese – 4 cubes
4.       Dark brown sugar -  5 tbspns
5.       Butter  - 2 tbspns
6.       Salt     -  a pinch
7.       Melted butter – 2 tbspns

Method:

1.       Preheat oven to 200°C. Grease a 6 cavity muffin pan.
2.       Wash and clean the yam and boil till soft.
3.       Drain and Chop the yam finely.
4.       In a heavy bottom sauce pan, heat the butter and add the chopped yam.saute for a minute
5.       Now add the brown sugar and salt and mix well.
6.       Let it boil and thicken. stir occasionally so as not to burn the sugar.
7.       Switch off and let cool.
8.       Now cut the spring roll strips into equal squares.take one square and apply melted butter with a pastry brush.next place another square on top of the buttered square so that the edge of the top square is slightly adjacent to the edge of the bottom square.now butter the top layer and place one more square strip on top in the same way.(pics attached below for easy understanding).keep adding layers until you are satisfied and all the edges are almost done placing next to each other.(if using homemade sheets..slightly dust the working floor before assembling)


9.       Now lift the layers and place it in the muffin cavities.be gentle ,lifting them roughly tears the sheets.
10.   Bake in the oven for 10mins or until slightly browned.remove from oven and cool on wire rack.when removed they tend to be crispy and will hold their shapes like flowers.
11.   Grate the cheese cubes finely.Add a teaspoon of the cheese to the flower cups.on top of it place a tablespoon of caramelized yam and top it with another teaspoon of grated cheese.repeat the process for all the flower cups.
12.   Now bake the flower cups again for 3-5mins at 200°C.the edges should darken .remove and cool in wire rack.
13.   Serve hot with ketchup or ranch.


Cook's Note:
1.always serve the cups warm before the cups loses their crispiness.
2.when serving to very small kids slightly trim the tips of the cups so that they dont prick their soft tissues when they take a bite.
3.if you dont have brown sugar you can substitute regular white sugar but i brown sugar adds more flavour to it.




Thursday, 9 June 2016

Chicken pizza rolls


I am a great fan of pizza and so are my kids..i wanted to do something different for the kids that includes all the flavours of pizza and also should be a light snack in the evening for kids..this pizza roll can be loaded with any veggies or meat of your choice. I have used chicken but you can use any meat or a combination of meats and also you can make it purely veggie rolls by omitting the chicken..it tastes yum even when made it as veggie rolls..i love to use homemade pizza sauce but you can use store bought sauce too..enjoy this cheesy cheesy pizza rolls

            Ingredients:

For the pizza base:

      1.       All purpose flour/maida  -  250gms
       2.       Active Dry yeast  -  1 ½  teaspoons
3.       Salt                -   ¼ th teaspoon
                            4.       Lukewarm water  -  160ml (adjust accordingly)
5.       Sugar              -     1 teaspoon
   6.       Olive oil         -      1 tablespoon

For the pizza sauce:

     1.       Onion  -  1 finely chopped
2.       Tomatoes  -  2 pureed
3.       Garlic   -    4-5 cloves
4.       Oregano – 1 teaspoon
5.       Basil – 1 teaspoon
             6.       Bell pepper – 1 small chopped
    7.       Pepper and salt as needed
8.       Sugar  -  1 teaspoon
              9.       Tomato ketchup – 1 tablespoon
10.   Bayleaf – 1
               11.   Cinnamon – 1inch stick (optional)
12.   Olive oil – 1 tablespoon

For the filling:

     1.       Chicken -  250gms
                                             2.       Mozzarella cheese – 400gms finely grated.
                             3.       Onion    -  1 large chopped finely
                                       4.       Bell pepper – 1 medium chopped finely
 5.       Tomatoe -  1
        6.       Pepper    -   1 teaspn
7.       Salt as needed
                  8.       Garlic    -   4 cloves crushed


Method:

  • ·         To make the pizza base , warm the water slightly (it should be bearable to touch/lukewarm).add the sugar and yeast and mix well.close the bowl and place it in a warm place.let the mixture sit for 5 mins
  • ·         Meanwhile sift the flour with salt.
  • ·         After 5mins the water yeast mixture bubbles/froths. .if you don’t see frothing then its time to buy new yeast packet or you can use instant dry yeast which doesn’t need proofing and can be added directly with the dry ingredients.
  • ·         Make a well in the center of the flour and add the water yeast mixture and olive oil all at once and slightly knead them till they come together.
  • ·         Oil a bowl generously and place the dough in it.
  • ·         Loosely cover the bowl and let the dough to double up (around 1-2 hrs)
  • ·         Meanwhile make the pizza sauce and filling and keep it ready
  • ·         For the pizza sauce, heat the olive oil in a pan and add the cinnamon n bayleaf.saute for a min.
  • ·         Next add the garlic,onions and fry till golden.
  • ·         Add the bell pepper and fry for another 3mins
  • ·         Now add the tomato puree,ketchup,oregano,basil,pepper salt and mix well.
  • ·         Cover and cook for 4-5mins mixing inbetween.
  • ·         Let it cool .remove the bay leaf and blend in a food processor to a fine paste.
  • ·         If you love chunks you can use as it is without blending.i like it smooth.
  • ·         For the chicken chunks…wash n clean the chicken.in a pressure pan add enough water and add the chicken pieces,onions ,garlic ,pepper and salt.let it cook for 3 whistles.let the pressure subside and drain the chicken..you can use the broth to make some soups.dont discard.remove the bones from chicken and chop it finely or into cubes or as how you like it to be.
  • ·         Preheat the oven to 200 degree celcius.grease your oven tray liberally with olive oil.
  • ·         Now the dough should have risen.do not punch the dough.slightly bring the dough together and refrigerate for 10mins.
  • ·         Dust the working surface liberally with all purpose flour/maida.
  • ·         Roll the dough into a rectangular shape dusting with apf when they become sticky.
  • ·         Now spread the pizza sauce .
  • ·         Sprinkle the chicken pieces,tomatoes and bell pepper.
  • ·         Sprinkle cheese liberally all over the filling.
  • ·         Now roll the dough starting from the lengthy side .and cut them into equally sized rolls.
  • ·         Place the rolls in the oven tray such that the spiral side is facing upwards.sprinkle some more cheese on top.
  • ·         Let it rise for another 15mins.
  • ·         Bake in the preheated over for about 15-20 mins or until golden.
  • ·         Serve hot with ketchup or any dip of you choice.enjoy

      COOK’S NOTE:
  • ·         The dough feels slightly sticky when you try to knead or shape up, do not worry, lightly dust the working floor and your hands with some flour and start working.
  • ·         The remaining dough can be refrigerated in an airtight box and can be used within the next 4 days.
  • ·         This dough can also be used for flat pizza base .


Monday, 30 May 2016

Cream Cheese Icecreams (strawberry,mango and pineapple)


I love icecreams (i know...who does'nt love them)..i always wanted to try everything at home from scratch as we know exactly what goes inside it...i wanted to make something different from the regular icecreams..So thought why not try icecreams using cream cheese as i had lots of cream cheese left in my fridge..and also i had some fresh strawberries, mangoes and pineapple,,,so i thought let me infuse fresh fruits in my new version of icecreams..it is so so easy to make ..you can puree the fruits or you can jus pulse them for few secs so that there will little chunks of the fruit in your icecreams or you can chop the some extra fruit into little cubes and add them finally to the icecream batter(see notes)..I havent used any artificial flavours or extracts here..why to use them when you get fresh flavours from fresh fruits..and also no eggs and gelatine are used in my recipe..


Ingredients:


  •         Cream cheese   -  300gms
  • .       Fresh cream      -   300ml
  • .       Milk                    -   250ml
  • .       Salt                     -  a pinch
  • .       Sugar                  -  1 cup
  • .       Fresh strawberry puree – ½ cup
  • .       Fresh mango  puree  -  ½ cup
  • .       Fresh pineapple puree – ½ cup


Method:


  • 1.       Blend the cream cheese with a hand blender until smooth.
  • 2.       Mix in the fresh cream and sugar and blend at low speed until the cream cheese and the fresh cream blends well and also till the sugar dissolves.then increase the speed to high and blend it till the mixture becomes frothy.
  • 3.       Add the milk and salt and mix on low speed until well incorporated.
  • 4.       Now divide the mixture into 3 equal portions and mix in the fruit purees .
  • 5.       Pour it in a freezer safe container.cling wrap and close the lid.let it set for 4hours.
  • 6.       Now remove the icecream from the freezer (it should be only half frozen by this time), and blend with electric mixer at high speed for about 3mins.repeat the same with other icecreams too.
  • 7.       Pour it back again in the container ,cling wrap ,close the lid and freeze it overnight.
  • 8.       Your 3 flavoured icecreams are ready. Scoop and garnish as your desire.
                      COOK'S NOTE:
  •    .  Always blend cream cheese after it comes to room temperature.
  •     .Fresh cream should be chilled.
  •     Use fresh fruits for best results.do not use canned/tinned fruits for this recipe.
  •     If you wanted to add fresh fruit chunks ,add them after the initial setting and before the final freezing.
  •   . You can blend the icecreams even thrice if you want..the more you blend and freeze the more softer the icecreams turns out.it needs patience..so for me one time blending and freezing would suffice..
  •      please give your valuable feedback.if you have tried please add in your icecrEam pics..happy summer :)


Friday, 15 April 2016

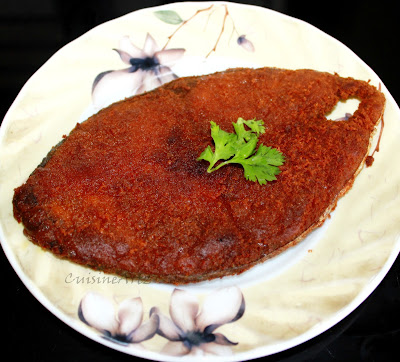
Masala fish fry


This is something which i make for my family often,as we are more of a seafood kinda family..LOL..
My kids love this fish fry.This is so easy to make and can be made in a jiffy and kids will love it.Adjust the spiciness according to your taste.You will learn to master the spiciness of dishes once you start cooking everything with that utmost passion.Obviously food served with love tastes good and food cooked with passion tastes the best...So dont laze around ..get down and start preparing this dish and you will know how easy it is to make and awesome it tastes..


INGREDIENTS:
  • Seer fish      -       5 pieces
  • turmeric powder-  1/2 teaspoon
  • Red chilli powder - 3 tablespoon
  • ginger garlic paste - 1 tablespoon
  • Coriander powder -  1 tbsp
  • lime juice              -   2 tspn
  • rice flour               -   2 tbsp(optional)
  • salt to taste
  • sesame oil to shallow fry

 METHOD:

  1. Wash and clean the fish thotoughly.
  2. mix all the ingredients except fish in a mixing bowl without adding any water.
  3. now apply the masala mix on both sides of the fish slices.
  4. let it marinate for 1 hr.
  5. heat oil in a pan for shallow frying and add the fish slices one at a time
  6. let it simmer for 5 mins and flip over the slice and let it cook for another 5mins .
  7. remove from flame and garnish with coriander leaves.
  8. repeat for all the remaining fish slices.


COOK'S NOTE:
  1. i used seer fish here but you can use the same masala for any fish fry.
  2. always use sesame oil for the best taste and also it has got the best nutritional value.
  3. always simmer the fish so that it cooks nicely through the centre or it will be cooked outside and remains raw on the inside.
  4. i used rice flour to get that crisp.but you can skip the rice flour.
  5. i like the fish to be somewhat soft ,so i used medium thickness for the slices.But if you wish to have a super crispy fry,then you can use thinner slices.


Friday, 11 March 2016

CRISPY MASALA FRIED NAATU KOZHI/COUNTRY CHICKEN


When it comes to chicken , evreyone is excited at home..and kids love to have anything that is crispy..
i mostly prefer naatu kozhi/country chicken as they are more healthier than the broiler chicken and absolutely good for health especially for kids..the country chicken is not too fleshy like broiler but is completely packed with nutrients as it is allowed to grow on its natural habitat and allowed to feed on its own or fed with only organic food..so anytime it is the most healthier one..And it doesn't mean i dont take broiler..i do use broiler chicken when i am in need of something fleshy as in for a pizza or any baked or grilled chicken.But i advice everyone to choose naatu kozhi whenever possible.

This dish is a combination of just very basic ingredients.I mostly avoid getting packed masalas and love to use everything fresh at home..and this one is completely prepared at home..I wanted something more south indianised ,so i came up with this simple and very very easy recipe.


INGREDIENTS:

  • Chicken ½ kg with skin
  • Lime juice -1 tbsp
  • Red Chilli powder- 2 teaspoons
  • Ginger garlic paste Or ginger garlic crushed -2tbspn
  • Egg - 1 beaten
  • Curd - 1 tbspn
  • Turmeric powder - 1/2 teaspoon
  • Oil to deep fry
  • Salt to taste
  • coriander leaves(optional) chopped.


METHOD:

  1. Wash and clean chicken thoroughly.
  2. Mix all the ingredients together and marinate the chicken in it for an hour.
  3. Heat oil in a pan and add the chicken slowly..since we are adding egg the oil might rise up and overflow.so use a wide and deep pan so that the oil fills nly ¼th of it.
  4. Cook on medium heat till the chicken turns golden brown.I like deep browns ,so i left it a little longer.keep turning the pieces so as to cook evenly.
  5. Keep the chicken in paper kitchen towels to remove the excess oil.
  6. garnish with coriander.
COOK'S NOTE:

  • When you buy country chicken , the butcher usually applies sufficient amount of turmeric over the meat so as to reduce the odor which the country chicken gives unlike the broiler.
  • you can remove skin if you wish but having it on makes the chicken more crispier.
  • Using egg makes the oil to rise up.So be careful and always fill only 1/4th of the pan.
  • add the pieces carefully fron the sides of the pan(like how you add pooris into the oil).this makes it not to splatter on you.
  • Always be careful while handling stuffs with oil oil in pans.never allow kids near while you are working with hot oil.

Thursday, 25 February 2016

Onion garlic chutney


                        I love chutnies made with onion and garlic..they are healthier and also tastes great with any tiffin varieties.this is so easy to make and you just need the basic ingredients you have at home.just very few steps and you will have your chutney ready .this is a must have recipe and will definitely come in hand when you are in a hurry.this is a medium spicy recipe,if you want you can add or reduce the red chillies according to your choice of spicyness.lets see the recipe..


Ingredients:
Onions   -     2 large
Garlic.    -     6 cloves
Dried red chillies - 6
Tamarind.  -  small piece
Bengal gram. -  2 tablespoons
Salt to taste
Mustard seeds. -   1 teaspoon
Curry leaves.  -   few
Oil to temper


Method:
1.heat oil in a pan and fry Bengal gram,onions,red chillies and garlic till golden brown.
2.Grind coarsely along with tamarind and salt.
3.temper mustard and curry leaves and add to the chutney.

how simple it is...just try once and you will definitely love it.


Monday, 22 February 2016

Easy fish fry


 At my home , everyone of us is a seafood lover..we cannot resist when it comes to seafood.My kids follow the same trend..they love fish.So i often make some dishes with fish .When i dont have much time and if am in a  hurry,i make this fish fry which you can make in a jiffy..you just need the basic ingredients for this dish and i bet you can finish it of within half an hour.I used seer fish here(vanjaram )..but you can use the same recipe for any fish fry.

This is a fish fry i often make for the kids ..It is nice and crisp on the outside and i bet this would be your one of the must recipes in your cook book..And yes you can gulp a fish hot from the tawa while you wait while frying the other pieces.. nothing tastes better when eaten directly from the pan..isnt it?
Okay lets get into the recipe..

INGREDIENTS:

  • Seer fish                           -            1/2kg(cut into medium slices)
  • chilly powder                   -            3 tbspns
  • turmeric powder              -            1/2 tspn
  • salt                                   -            to taste
  • rice flour(optional)          -            2 tbspns
  • lime  wedges                    -           for garnish
  • oil to fry the fish
METHOD:
  1. clean the fish slices well and keep aside
  2. Mix all the spice powders and rice flour if using.Add the salt.
  3. Now check the taste (add more salt now if required)
  4. now marinate the fish slices in the spice mix.
  5. leave it for 15mins.
  6. heat enough oil in a pan(we are going to shallow fry and not deep fry the fish slices.)
  7. when the oil is hot enough add one slice and let it cook on low flame for 5mins.after 5mins flip over to the other side and let it simmer for another 5mins.(be carefull while flipping ..use two flat ladles to support the slice on top and bottom surface .otherwise the fishh will break into pieces.)
  8. remove from pan .fry the rest of the pieces int he same way .
  9. transfer to serving plate and garnish with lime/lemon wedges.
COOK'S NOTE:
  1. Always wash the fish slices thoroughly.
  2. you can also deep fry the fish.but i prefer to shallow fry them which is equally deliscious.
  3. You can use any type of fish and use this recipe to fry them.
  4. Always cook the fish at low flame so that it cooks evenly from inside out ..medium or high flame turns the outside dark and leaves you with an uncooked fish on the inside.Be careful.
  5. Adding rice flour adds extra crispiness for the fish.(but you can skip it as the fry will be crisp even without the rice flour)
  6. give atleast 5mins on each side foe the fish to cook completely.(this also ensures the microbes to get destroyed completely)
  7. Always wash your hands with soap after handling raw fish.do not touch any other kitchen stuffs before washing your hands.this applies even while handling any  raw meat.
  8. the marinated meat can be frozen for a week for later use.thaw it overnight in the fridge.

Tuesday, 16 February 2016

Diced bread mexicana


       Okay..this is a very easy recipe and when you got left over bread or when you want to make a quick snack for your kids when they are back from school..i love to experiment with different foods and one such experiment turned out so yummiliscious...this is best served with tomato ketchup or any mexican dip of ur chocie..there is nothing much to write bout it ..lets see the recipe.


 Ingredients:

  • Bread slices -  10
  • Onion.   -     2 large
  • Tomatoes -  2 large
  • Capsicum -  1
  • Tomato ketchup - 1 tablespoon
  • Pepper. -  1 tsp
  • Garlic -  4 cloves minced
  • Mexican seasoning -  1 tbsp
  • Oregano. -  1 tsp
  • Salt to taste
  • Olive oil - 1 tbsp

Method:
1.remove the rough crusts of the bread on all sides.Slice the the bread into small cubes.
2.slice the onions length wise .
3.puree the tomatoes
4.finely mince the garlic .
5.heat olive oil in a pan and add the garlic.saute for few secs.
6.add the onions and fry till golden.
7. add the tomato puree and capsicum and saute till raw smell leaves .
8.add the pepper powder, salt and ketchup.mix well
9.add the bread cubes and Mexican seasoning and the oregano.Mix well .
10.Fry for 5mins till all the bread cubes are well coated with the masala .
11.Remove from flame and serve with tomato ketchup.

COOK'S NOTE:
  1. you can use any veggies of choice and add them while sauting capsicum..if using potatoes or peas ,they should be cooked prior to adding in the pan with other veggies.
  2. you can use ready made mexican seasoning or make and stoore at hoem.i will bring up the post of mexican seasoning in the near future and add the link here.


Friday, 1 January 2016

Pepper chicken Masala /Chicken pepper fry


This pepper chicken masala is a childhood favourite of mine(know why?coz it is my momz recipe)...My mom makes this delicious gravy on most of the sundays and yes i will be waiting for those sundays after the tiresome studies everyday..So when ever she starts preparing the masala ,the entire house will be filled with the special aroma of the pepper and onion ..(ofcourse, i cannot wait till it is done)..the chicken has to be cooked till tender with the masala in a pressure cooker (or it can be directly done in the kadai/pan.but takes quite a long time)..So, when my mom opens the cooker and before frying the chicken in the kadai ,she always calls me to taste and ensures that whatever she has added is all perfect..(and she does this for every dish..she calls me and asks me to have a taste..and thats how i started developing the instinct to taste and find out what will go wrong in the dish before it is completely done and before it reaches others' plate..)..And this tasting moment...ooooohhh..i will be waiting for it..while tasting i ask her to keep 2 or 3 pieces extra to satiate my cravings..And now  it has become my responsibility to do the same to my mum..whenever i prepare a dish ,i call her to taste ..Those days and my momz food are still very very close to my heart ..

This is a very easy preparation..you just need 3 ingredients for the masala..and you need not sit and chop them finely..this recipe calls for the entire ingredients to be ground to a fine paste and you just got to wash and cut them roughly..(How easy it is)..

This gravy tastes to its fullest only when you fry the chicken (once it is cooked well in pressure cooker) in an iron kadai/iron pan...only frying it in the iron kadai gives you its characteristic colour (kind of dark brown and reddish)..you can very well make it in other pans but i suggest u invest in one iron kadai/iron pan to get that exact flavour..So here goes the recipe

INGREDIENTS:
  • CHICKEN   -   1kg
  • onions         -    6 large
  • Whole peppercorns      -     2 tablespoons
  • garlic         -      6-8 cloves
  • turmeric powder -  1/4th teaspoon 
  • sesame oil    -     4 tablespoons
  • salt to taste
  • coriander to garnish
METHOD:
  1. wash the chicken nicely and keep aside.
  2. chop the onions roughly.
  3. grind the onions,garlic and pepper to a fine paste.
  4. add the chicken along with the onion paste,turmeric powder and required salt in a pressure cooker and cook till tender(3-4 whistles).usually the onion paste and chicken gives out enough water for the chicken to cook..but if you feel it is very less then you can add 1/4th cup of water.
  5. let the pressure leaves.open the lid .
  6. heat the oil in the iron kadai,and add the chicken along with the gravy.
  7. let it cook till the gravy thickens and the chicken changes to dark brown and reddish.keep adding little oil if the gravy sticks to the bottom.
  8. remove from flame and garnish with coriander
  9. if you want to have a chicken pepper fry ,you can keep frying till the gravy thicken ans starts coating the chicken.this gives you a lovely chicken pepper fry.
  10. you can serve it plain or jeera rice or any pulao.

COOK'S NOTE:
  • Always add very little salt while cooking in the pressure cooker.When you fry the chicken and gravy in the kadai and as it thickens the salt becomes more n more concentrated..YOu can always add extra salt as it thickens..adding more in the begining will leave you with a salty gravy.
  • you can do the entire cooking in the kadai itself,but it takes extra time to cook.pressure cooking is the easiest n time saving method.
  • the onion paste and chicken leaves enough water..So add water accordingly.
  • you can even keep frying till the gravy thickens and just coats the chicken.this gives you a lovely chicken pepper fry